{
  "openapi": "3.1.0",
  "info": {
    "title": "MemMachine Memory API v2",
    "description": "API for storing and retrieving long-term memories using v2 API format. Use this to remember important information about users across conversations.",
    "version": "v2.0.0"
  },
  "servers": [
    {
      "url": "A HTTPS URL hosting MemMachine",
      "description": "MemMachine API server"
    }
  ],
  "paths": {
    "/api/v2/memories": {
      "post": {
        "description": "CRITICAL: Use this on EVERY message to store new information. Automatically store any new facts, preferences, plans, or details the user shares. Include full context in content field. Always prepend with date in YYYY-MM-DD format if you know the timezone.",
        "summary": "Store a new memory",
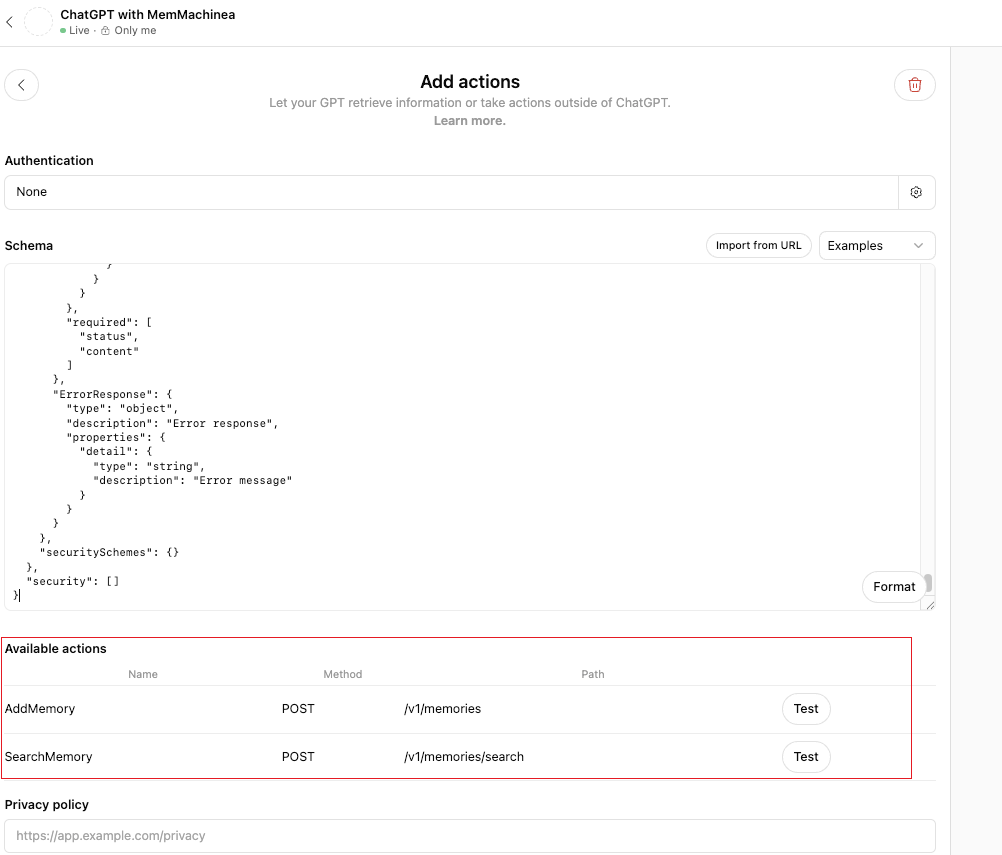
        "operationId": "AddMemory",
        "x-openai-isConsequential": false,
        "security": [
          {
            "bearerAuth": []
          }
        ],
        "requestBody": {
          "required": true,
          "content": {
            "application/json": {
              "schema": {
                "$ref": "#/components/schemas/AddMemoryInput"
              }
            }
          }
        },
        "responses": {
          "200": {
            "description": "Memory successfully stored",
            "content": {
              "application/json": {
                "schema": {
                  "$ref": "#/components/schemas/AddMemoryResponse"
                }
              }
            }
          },
          "400": {
            "description": "Bad request",
            "content": {
              "application/json": {
                "schema": {
                  "$ref": "#/components/schemas/ErrorResponse"
                }
              }
            }
          },
          "422": {
            "description": "Validation error",
            "content": {
              "application/json": {
                "schema": {
                  "$ref": "#/components/schemas/ErrorResponse"
                }
              }
            }
          }
        }
      }
    },
    "/api/v2/memories/search": {
      "post": {
        "description": "CRITICAL: Use this on EVERY message to retrieve context. Always search for relevant past information before responding. This searches both episodic memory (conversation history) and semantic memory (long-term user traits and facts) to provide personalized responses. Optional: set agent_mode=true to use retrieval-agent search. In agent mode, score-threshold filtering is not supported.",
        "summary": "Search memories",
        "operationId": "SearchMemory",
        "x-openai-isConsequential": false,
        "security": [
          {
            "bearerAuth": []
          }
        ],
        "requestBody": {
          "required": true,
          "content": {
            "application/json": {
              "schema": {
                "$ref": "#/components/schemas/SearchInput"
              }
            }
          }
        },
        "responses": {
          "200": {
            "description": "Search results returned successfully",
            "content": {
              "application/json": {
                "schema": {
                  "$ref": "#/components/schemas/SearchResult"
                }
              }
            }
          },
          "400": {
            "description": "Bad request",
            "content": {
              "application/json": {
                "schema": {
                  "$ref": "#/components/schemas/ErrorResponse"
                }
              }
            }
          },
          "422": {
            "description": "Validation error",
            "content": {
              "application/json": {
                "schema": {
                  "$ref": "#/components/schemas/ErrorResponse"
                }
              }
            }
          }
        }
      }
    }
  },
  "components": {
    "schemas": {
      "AddMemoryInput": {
        "type": "object",
        "description": "Input for storing a new memory using v2 API format",
        "properties": {
          "org_id": {
            "type": "string",
            "default": "universal",
            "description": "Organization ID. Use 'universal' as default.",
            "example": "universal"
          },
          "project_id": {
            "type": "string",
            "default": "universal",
            "description": "Project ID. Use 'universal' as default.",
            "example": "universal"
          },
          "messages": {
            "type": "array",
            "description": "Array of memory messages to store",
            "minItems": 1,
            "items": {
              "$ref": "#/components/schemas/MemoryMessage"
            }
          },
          "types": {
            "type": "array",
            "description": "Memory types to store. Empty array means all types (episodic and semantic).",
            "items": {
              "type": "string",
              "enum": ["episodic", "semantic"]
            },
            "default": []
          }
        },
        "required": [
          "org_id",
          "project_id",
          "messages"
        ]
      },
      "MemoryMessage": {
        "type": "object",
        "description": "A single memory message",
        "properties": {
          "content": {
            "type": "string",
            "description": "The memory content to store. Include full context. Always prepend with current date in YYYY-MM-DD format if you know the user's timezone, UTC otherwise.",
            "example": "2024-11-04: User prefers Python over JavaScript for backend development"
          },
          "producer": {
            "type": "string",
            "default": "user",
            "description": "The ID of the entity that produced the content (usually the user ID)",
            "example": "Charles"
          },
          "produced_for": {
            "type": "string",
            "default": "",
            "description": "The ID of the entity the content was produced for (usually the agent ID)",
            "example": "Charles"
          },
          "role": {
            "type": "string",
            "default": "",
            "description": "Role of the message: 'user', 'assistant', or 'system'",
            "example": "user"
          },
          "timestamp": {
            "type": "string",
            "format": "date-time",
            "description": "ISO 8601 timestamp. Defaults to current time if not provided.",
            "example": "2024-11-04T10:00:00Z"
          },
          "metadata": {
            "type": "object",
            "description": "Metadata dictionary. Store user_id, agent_id, session_id, group_id here as strings.",
            "additionalProperties": true,
            "default": {},
            "example": {
              "user_id": "Charles",
              "agent_id": "Charles",
              "session_id": "Charles",
              "group_id": "Charles",
              "episode_type": "preference"
            }
          }
        },
        "required": [
          "content"
        ]
      },
      "SearchInput": {
        "type": "object",
        "description": "Input for searching memories using v2 API format",
        "properties": {
          "org_id": {
            "type": "string",
            "default": "universal",
            "description": "Organization ID. Use 'universal' as default.",
            "example": "universal"
          },
          "project_id": {
            "type": "string",
            "default": "universal",
            "description": "Project ID. Use 'universal' as default.",
            "example": "universal"
          },
          "query": {
            "type": "string",
            "description": "Natural language query to search for relevant memories",
            "example": "user preferences about programming languages"
          },
          "top_k": {
            "type": "integer",
            "description": "Maximum number of results to return. Default is 10.",
            "default": 10,
            "minimum": 1,
            "maximum": 100
          },
          "filter": {
            "type": "string",
            "description": "Filter expression as a string. Format: 'metadata.key=\\'value\\''. Use AND/OR for multiple conditions.",
            "default": "",
            "example": "metadata.user_id='Charles'"
          },
          "types": {
            "type": "array",
            "description": "Memory types to search. Empty array means all types (episodic and semantic).",
            "items": {
              "type": "string",
              "enum": ["episodic", "semantic"]
            },
            "default": []
          },
          "agent_mode": {
            "type": "boolean",
            "description": "Whether to use retrieval agent for memory search. Agent mode does not support score-threshold filtering.",
            "default": false
          }
        },
        "required": [
          "org_id",
          "project_id",
          "query"
        ]
      },
      "AddMemoryResponse": {
        "type": "object",
        "description": "Response from adding memories",
        "properties": {
          "results": {
            "type": "array",
            "description": "List of results for each added memory",
            "items": {
              "type": "object",
              "properties": {
                "uid": {
                  "type": "string",
                  "description": "Unique identifier of the stored memory"
                }
              }
            }
          }
        }
      },
      "SearchResult": {
        "type": "object",
        "description": "Search results containing memories from both episodic and semantic memory",
        "properties": {
          "episodic_memory": {
            "type": "array",
            "description": "Results from episodic memory (conversation history)",
            "items": {
              "type": "object",
              "additionalProperties": true
            }
          },
          "episode_summary": {
            "type": "array",
            "description": "Summaries of episodes",
            "items": {
              "type": "object",
              "additionalProperties": true
            }
          },
          "semantic_memory": {
            "type": "array",
            "description": "Results from semantic memory (long-term user traits and facts)",
            "items": {
              "type": "object",
              "additionalProperties": true
            }
          }
        }
      },
      "ErrorResponse": {
        "type": "object",
        "description": "Error response",
        "properties": {
          "detail": {
            "type": "string",
            "description": "Error message"
          }
        }
      }
    },
    "securitySchemes": {
      "bearerAuth": {
        "type": "http",
        "scheme": "bearer",
        "bearerFormat": "API Key",
        "description": "Get your API key from https://console.memmachine.ai/api-keys"
      }
    }
  },
  "security": [
    {
      "bearerAuth": []
    }
  ]
}