
MCP API Examples

Hello World: A Guide to the MemMachine MCP Server API

This guide provides a quick and simple way to get started with the MemMachine Model Content Protocol (MCP) Server API using curl commands. It can also be found in our Quick Start Guide.

Prerequisites

First, ensure your stand alone MCP server is up and running. You can use this sample command to start it:
MEMORY_CONFIG=config.yml uv run memmachine-mcp-http --host localhost --port 8080
In which config.yml is your MemMachine configuration file. localhost and 8080 are the host and port where the MCP server will listen for requests. If you want to check that the server is running correctly, you can use following steps to query the tools available on the server with curl.
1

Establish SSE connection and get session ID

We need a session id to work with the MCP server. We can obtain one by establishing a Server-Sent Events (SSE) connection.
curl -v -N http://localhost:8080/mcp/ -H "Accept: text/event-stream"
Here is a sample response you might see:
* Host localhost:8080 was resolved.
* IPv6: ::1
* IPv4: 127.0.0.1
*   Trying [::1]:8080...
* connect to ::1 port 8080 from ::1 port 62212 failed: Connection refused
*   Trying 127.0.0.1:8080...
* Connected to localhost (127.0.0.1) port 8080
> GET /mcp/ HTTP/1.1
> Host: localhost:8080
> User-Agent: curl/8.7.1
> Accept: text/event-stream
>
* Request completely sent off
< HTTP/1.1 400 Bad Request
< date: Fri, 31 Oct 2025 21:58:56 GMT
< server: uvicorn
< content-type: application/json
< mcp-session-id: 8f82399b29ba42d495ff44d5a9cf7862
< content-length: 105
<
{"jsonrpc":"2.0","id":"server-error","error":{"code":-32600,"message":"Bad Request: Missing session ID"}}
In this output, looking for the mcp-session-id header, you can see the session ID is 8f82399b29ba42d495ff44d5a9cf7862.
2

Initialize the session

Now that we have a session id, we can initialize the session by sending an initialize request to the MCP server.
curl http://localhost:8080/mcp/ \
  -H "Content-Type: application/json" \
  -H "Accept: application/json, text/event-stream" \
  -H "mcp-session-id: 8f82399b29ba42d495ff44d5a9cf7862" \
  -d '{
    "jsonrpc": "2.0",
    "id": 1,
    "method": "initialize",
    "params": {
      "protocolVersion": "2024-11-05",
      "capabilities": {},
      "clientInfo": {
        "name": "curl-client",
        "version": "1.0.0"
      }
    }
  }'
Here is a sample response you might see:
event: message
data:
{
  "jsonrpc": "2.0",
  "id": 1,
  "result": {
    "protocolVersion": "2024-11-05",
    "capabilities": {
      "experimental": {},
      "prompts": {
        "listChanged": true
      },
      "resources": {
        "subscribe": false,
        "listChanged": true
      },
      "tools": {
        "listChanged": true
      }
    },
    "serverInfo": {
      "name": "MemMachine",
      "version": "1.16.0"
    }
  }
}
3

Send initialized notification

After initializing the session, we need to send an initialized notification to the MCP server.
curl http://localhost:8080/mcp/ \
  -H "Content-Type: application/json" \
  -H "Accept: application/json, text/event-stream" \
  -H "mcp-session-id: 8f82399b29ba42d495ff44d5a9cf7862" \
  -d '{
    "jsonrpc": "2.0",
    "method": "notifications/initialized"
  }'
The request should succeed without any errors.
4

List available tools

Now we can list the available tools by sending a tools/list request to the MCP server.
curl http://localhost:8080/mcp/   \
    -H "Content-Type: application/json" \
    -H "Accept: application/json, text/event-stream" \
    -H "mcp-session-id: 8f82399b29ba42d495ff44d5a9cf7862"   -d '{
    "jsonrpc": "2.0",
    "id": 2,
    "method": "tools/list",
    "params": {}
  }'
Here is a sample response you might see:
event: message
data:
{
  "jsonrpc": "2.0",
  "id": 2,
  "result": {
    "tools": [
      {
        "name": "add_memory",
        "description": "Store important new information about the user or conversation into memory. Use this automatically whenever the user shares new facts, preferences, plans, emotions, or other details that could be useful for future context. Include the **full conversation context** in the `content` field — not just a snippet. This tool writes to both short-term (episodic) and long-term (profile) memory, so that future interactions can recall relevant background knowledge even across different sessions.",
        "inputSchema": {
          "$defs": {
            "AddMemoryParam": {
              "description": "Parameters for adding memory.\n\nThis model is used by chatbots or agents to store important information\ninto memory for a specific user. The content should contain the **full\nconversational or contextual summary**, not just a short fragment.\n\nChatbots should call this when they learn new facts about the user,\nobserve recurring behaviors, or summarize recent discussions.",
              ...
}

Working with Claude Desktop App

The Claude Desktop App allows the developer to easily interact with the MCP server. To configure the Claude Desktop App to connect to your MCP server, follow these steps:
  1. Open the Claude Desktop App.
  2. Navigate to the settings section.
  3. Navigate to the Developer tab.
  4. Click Edit Config and it will pop up the location of the configuration file.
  5. The configuration file is named claude_desktop_config.json. Edit the file to include the MCP stdio mode.
This is the recommended method for running MemMachine locally using Docker. It’s the easiest way to get started. Step 1: Start MemMachine with Docker Compose First, start MemMachine using the provided script:
./memmachine-compose.sh
This will start all required services (PostgreSQL, Neo4j, and MemMachine) in Docker containers. The MemMachine container will be named memmachine-app. Step 2: Configure Claude Desktop Edit claude_desktop_config.json with the following configuration:
{
  "mcpServers": {
    "memmachine": {
      "command": "docker",
      "args": [
        "exec",
        "-e",
        "MM_USER_ID=Your Name",
        "-i",
        "memmachine-app",
        "/app/.venv/bin/memmachine-mcp-stdio"
      ],
      "env": {
        "MEMORY_CONFIG": "/app/configuration.yml",
        "PYTHONUNBUFFERED": "1"
      }
    }
  }
}
Replace Your Name with your desired user ID. The memmachine-app is the default container name created by the Docker Compose setup. Configuration Details:
  • memmachine-app: The Docker container name (default from memmachine-compose.sh)
  • MEMORY_CONFIG: Path to the configuration file inside the container
  • MM_USER_ID: Your user identifier for memory sessions
  • PYTHONUNBUFFERED: Ensures immediate output from Python

Option 2: Using UV (Development Environment)

Here is an example of working in the development environment with uv. In order to call the command, you need to have uv installed and issue uv build to build the project first.
{
  "mcpServers": {
    "memmachine": {
      "command": "[path to]/uv",
      "args": [
        "run",
        "[path to]/MemMachine/.venv/bin/memmachine-mcp-stdio"
      ],
      "env": {
        "PYTHONUNBUFFERED": "1",
        "MEMORY_CONFIG": "config.yml",
        "MM_USER_ID": "user"
      }
    }
  }
}
In which config.yml is your MemMachine configuration file. user is the user ID you want to use for the session.
  1. If you installed MemMachine as a python package, you can replace the command with:
memmachine-mcp-stdio
Note that in stdio mode, you can use environment variables to pass the configuration to the MCP server.
  • MEMORY_CONFIG: Path to the MemMachine configuration file.
  • MM_USER_ID: User ID for the session.
  • MM_PROJ_ID: (Optional) Project ID, default to mcp-<MM_USER_ID> if not specified.
  • MM_ORG_ID: (Optional) Organization ID, default to mcp-universal if not specified.`
  1. Save the configuration file and restart the Claude Desktop App. Note that the logs are written to stderr as well so they will be available in Claude’s log folder. Check that log if anything went wrong.
  2. If you navigate to the Developer tab again, you should see memmachine as an option in the MCP Server dropdown.
  1. Add a Global Prompt in Claude Desktop
This step helps Claude consistently call MemMachine MCP in every conversation. Claude Desktop lets you set a personal preference prompt. If you want Claude to use MemMachine MCP on every question, add the following line:
you MUST actively use MemMachine MCP on EVERY Question
How to add it:
  1. Open Claude Desktop
  2. Go to Settings
  3. Click General
  4. Find “What personal preferences should Claude consider in responses?”
  5. Paste the sentence into the text box
  6. Save your settings
  7. If you want to connect to a MCP running in HTTP mode. You can replace the configuration with this:
{
  "mcpServers": {
    "memmachine-http": {
      "command": "/Users/cedric/.nvm/versions/node/v20.19.5/bin/npx",
      "args": [
        "mcp-remote",
        "http://localhost:8080/mcp",
        "--allow-http",
        "--header",
        "user-id: user"
      ]
    }
  }
}
In which localhost and 8080 are the host and port where your MCP server is running. user is the user ID you want to use for the session. Note that you need node v20+ and npx installed to use the mcp-remote command. It basically acts as a proxy between the Claude Desktop App and the MCP HTTP server. Here is the list of supported headers you can pass to the MCP server:
  • user-id: User ID for the session.
  • proj-id: (Optional) Project ID, default to mcp-<user-id> if not specified.
  • org-id: (Optional) Organization ID, default to mcp-universal
  1. If something went wrong, you will see an error message popup when you start Claude Desktop App. You can also check the logs by clicking on
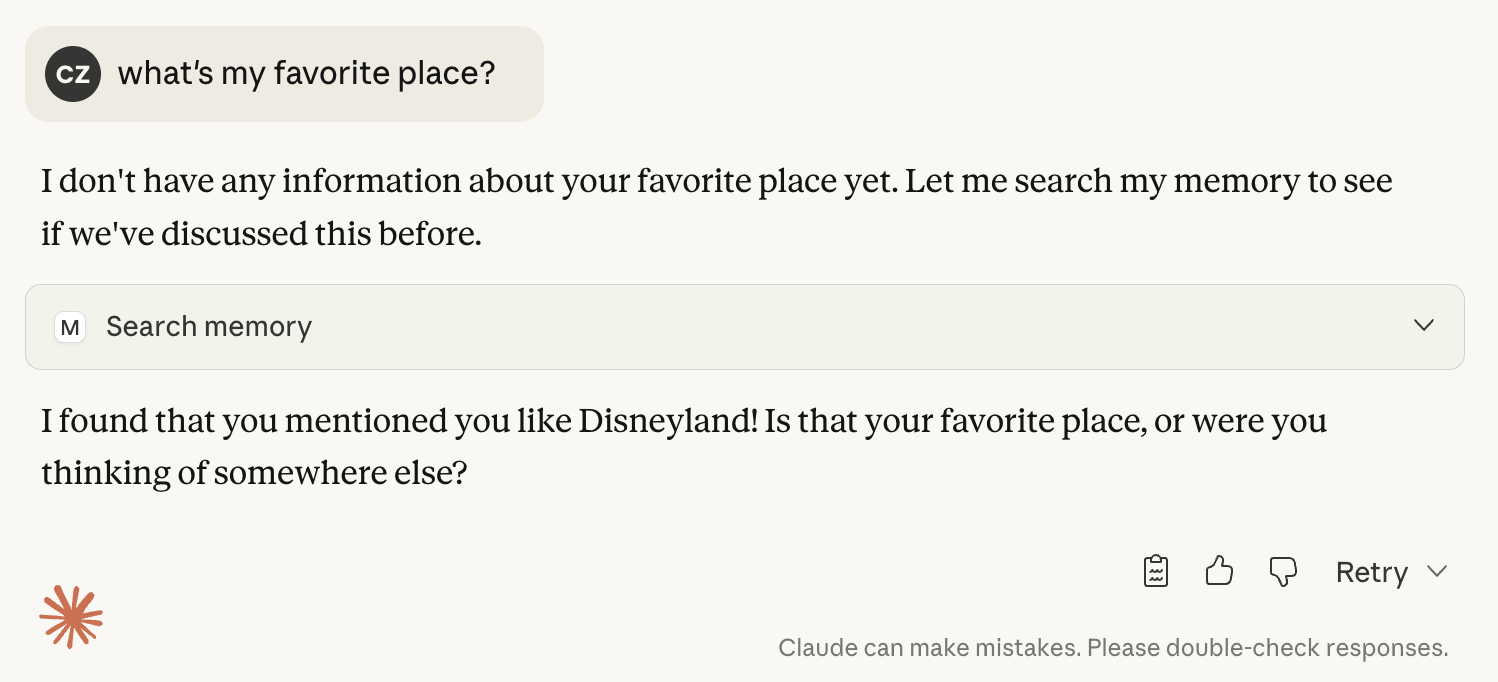
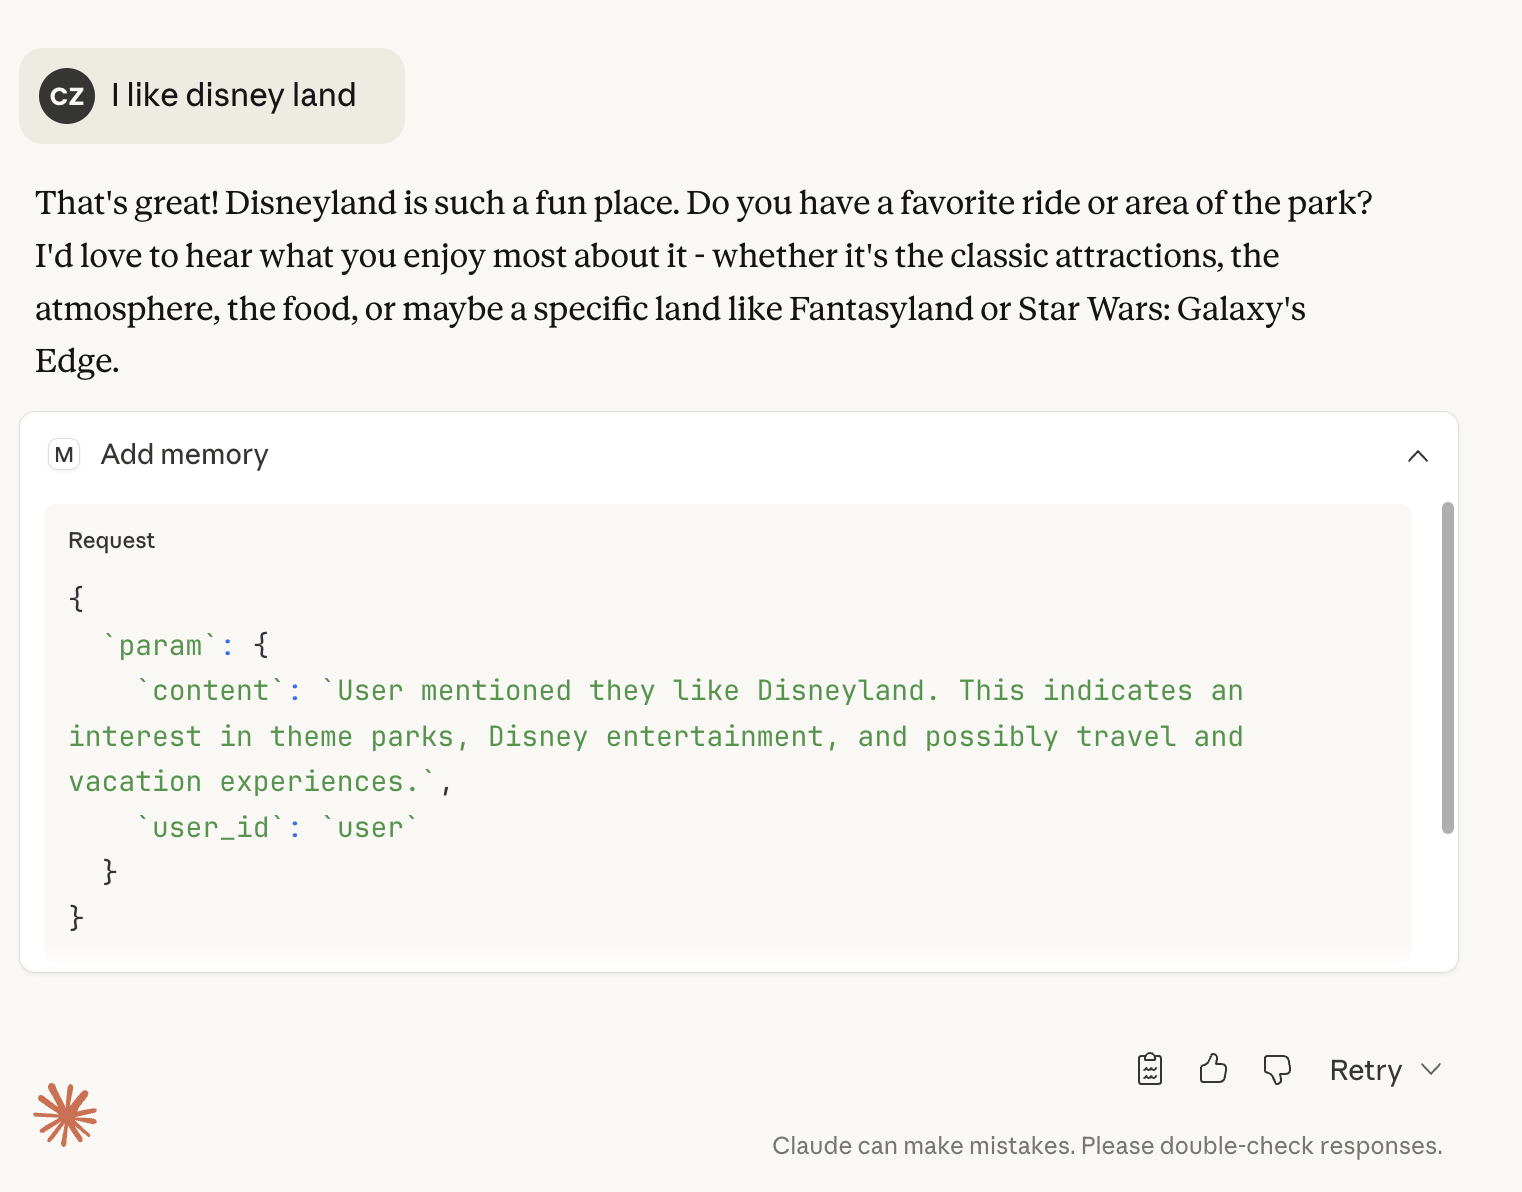
 View Logs button in the Developer tab.
  2. Now we can go back to the main screen and start a new conversation. You can say something like “I like Disneyland” and Claude should be able to remember that in the next conversation. You may need to allow the model to call MCP for the first time.
  1. Restart the Claude Desktop App and start a new conversation. Ask about your favorite places and see if Claude can remember them.